Add an event, design a template, pair a printer, and check in your first attendee, end to end.
This walkthrough takes you from an empty workspace to a working check-in station. You add an event from Eventbrite or Luma, design a badge template, pair a Zebra label printer, and hand your staff a 6-character code for mobile check-in.
An Eventbrite or Luma account connected to Badge, or your attendee list as a CSV.
For printing: a supported label printer and Google Chrome or Microsoft Edge on the print-station laptop.
Run the full flow
1
Add an event to Badge
Sign in at eventsbadge.com, open Events in the sidebar, and click Import Event. Pick Eventbrite or Luma in the provider picker, then click Import next to the event you want. Badge starts importing attendees in the background. See Add an event for the dialog reference. Registrations in a spreadsheet instead? Click Create Event, then upload the list as described in Upload attendees from a CSV.
2
Wait for the import to complete
The event opens in import-progress view while attendees are pulled from the provider. When the import finishes, the event detail page appears with stat cards, the staff access code, and a default badge template. See Sync status for what the status badges mean.
3
Design the badge template
On the event page, find the Badge Template card and click Manage, then open the default template. The visual editor opens with text, image, QR, and rectangle tools. Drop the elements you need and bind text fields to attendee data like full name, company, and ticket name. See Editor overview and Add elements.
4
Pair your Zebra printer
From the template editor toolbar, click Connect printer. The browser opens a permission dialog. Pick your Zebra model and click Connect, then click Print test to confirm the layout. Full setup is in Connect a printer. On a Windows laptop, complete Windows troubleshooting first.
5
Share the staff access code
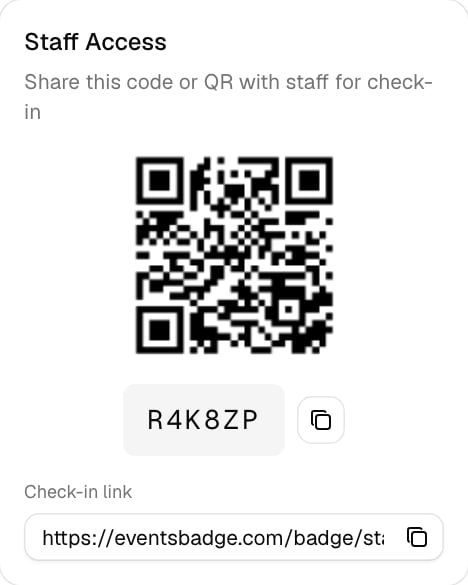
Back on the event page, the Staff Access card shows a 6-character code and a QR. Share the code with your check-in staff. They enter it at /badge/staff on any phone or tablet. See Get the access code for the share-and-handoff details.
The Staff Access card on the event page
6
Bring the print station online
On the laptop connected to the printer, click Station mode in the event header. The Station Setup card opens. Enter a Station Name, for example Main entrance, and click Go online. The station connects the printer and starts taking badge jobs. See Connect a printer.
7
Check in your first attendee
Have a staff member open the staff link on a phone. Check-in mode opens on its own. They tap the station chip in the header, pick your station, then tap Scan Ticket, scan a ticket QR, and confirm in the drawer. The attendee is marked checked in and the badge prints at the station. See QR scan check-in.
What’s next
Events, attendees, templates
The three core entities in Badge and how they relate.
Recovering from disconnect
What to do when an event’s DISCONNECTED badge appears.
Manual search check-in
Find attendees by name when QR scanning isn’t an option.
Printer settings
Label size presets and calibration from inside the editor.
{"docsConfig":{"theme":"sequoia","$schema":"https://mintlify.com/docs.json","name":"Badge Docs","colors":{"primary":"#5252FF","light":"#5252FF","dark":"#5252FF"},"logo":{"light":"https://mintcdn.com/eventsbadge/sVLPHidr7TFp4nzL/logo/badge-light.svg?fit=max\u0026auto=format\u0026n=sVLPHidr7TFp4nzL\u0026q=85\u0026s=590a54fc63ff87bdca58075533cb65a0","dark":"https://mintcdn.com/eventsbadge/sVLPHidr7TFp4nzL/logo/badge-dark.svg?fit=max\u0026auto=format\u0026n=sVLPHidr7TFp4nzL\u0026q=85\u0026s=db5ced8aea35e1113c6b80720ea1b62b","href":"https://eventsbadge.com"},"favicon":"https://mintcdn.com/eventsbadge/sVLPHidr7TFp4nzL/favicon.ico?fit=max\u0026auto=format\u0026n=sVLPHidr7TFp4nzL\u0026q=85\u0026s=1706fbaf5907770bee6a90027b7eb811","seo":{"metatags":{"canonical":"https://docs.eventsbadge.com"},"indexing":"all"},"integrations":{"posthog":{"apiKey":"phc_LzROzdSCd9XNasMbIfODwXmxSVhSl8ZureTWpnd4jyE","apiHost":"https://us.i.posthog.com"}},"styling":{"latex":false},"navigation":{"global":{"anchors":[{"anchor":"Badge Home","icon":"house","href":"https://eventsbadge.com"},{"anchor":"Book a Call","icon":"phone","href":"https://trytalkvalue.com/book-a-call"},{"anchor":"Status","icon":"circle-check","href":"https://status.trytalkvalue.com"},{"anchor":"Support","icon":"life-ring","href":"mailto:support@trytalkvalue.com"}]},"pages":[]}},"deployment":{"deploymentMetadataValue":{"subdomain":"eventsbadge","hasAudioNarration":false,"actualSubdomain":"eventsbadge","customDomains":["docs.eventsbadge.com"],"gitSource":{"type":"github","owner":"team-splab","repo":"talkvalue-frontend","deployBranch":"main","contentDirectory":"apps/docs","isPrivate":true,"mountPath":"","label":"","_id":"6b01b1202736933d857f03d7"},"entitlements":{},"buildId":"6b01be112736933d857f7906","clientVersion":"0.0.4270","searchFilterCounts":[{"language":"default","tag":"Guides","count":26},{"language":"default","tag":"Administration","count":14},{"language":"default","tag":"Events","count":6},{"language":"default","tag":"Billing","count":5},{"language":"default","tag":"Get started","count":4},{"language":"default","tag":"Printer setup","count":4},{"language":"default","tag":"Staff stations","count":4},{"language":"default","tag":"Account","count":3},{"language":"default","tag":"Workspace","count":3},{"language":"default","tag":"Concepts","count":3}]},"assistantConfig":{"enableAskAiButton":false,"enableStarterQuestions":false,"enableContextualStarterQuestions":false,"enableAskAiSearchBar":true},"basePath":"","hasChatPermissions":false,"hasWebMcpPermissions":false,"toggles":[{"name":"kill-isr","enabled":true,"variant":{"name":"disabled","enabled":false,"feature_enabled":true},"impressionData":false},{"name":"custom-rbac-roles","enabled":true,"variant":{"name":"disabled","enabled":false,"feature_enabled":true},"impressionData":false},{"name":"agent-mintlify-slack","enabled":true,"variant":{"name":"disabled","enabled":false,"feature_enabled":true},"impressionData":false},{"name":"agent-integrations-settings","enabled":true,"variant":{"name":"disabled","enabled":false,"feature_enabled":true},"impressionData":false},{"name":"rbac-expansion","enabled":true,"variant":{"name":"disabled","enabled":false,"feature_enabled":true},"impressionData":false},{"name":"automations-pr-grouping","enabled":true,"variant":{"name":"disabled","enabled":false,"feature_enabled":true},"impressionData":false},{"name":"custom-prefix","enabled":true,"variant":{"name":"disabled","enabled":false,"feature_enabled":true},"impressionData":false},{"name":"analytics-v7","enabled":true,"variant":{"name":"disabled","enabled":false,"feature_enabled":true},"impressionData":false},{"name":"user-flows-analytics","enabled":true,"variant":{"name":"disabled","enabled":false,"feature_enabled":true},"impressionData":false},{"name":"no-publish-flow","enabled":true,"variant":{"name":"disabled","enabled":false,"feature_enabled":true},"impressionData":false},{"name":"workos-onboarding","enabled":true,"variant":{"name":"disabled","enabled":false,"feature_enabled":true},"impressionData":false},{"name":"snapshot-serving-live","enabled":true,"variant":{"name":"disabled","enabled":false,"feature_enabled":true},"impressionData":false},{"name":"stripTemperatureMiddleware","enabled":true,"variant":{"name":"disabled","enabled":false,"feature_enabled":true},"impressionData":false},{"name":"support-platform-pylon-zendesk","enabled":true,"variant":{"name":"disabled","enabled":false,"feature_enabled":true},"impressionData":false},{"name":"snapshot-serving","enabled":true,"variant":{"name":"disabled","enabled":false,"feature_enabled":true},"impressionData":false},{"name":"instant-rollback","enabled":true,"variant":{"name":"disabled","enabled":false,"feature_enabled":true},"impressionData":false},{"name":"granular-notifications-server","enabled":true,"variant":{"name":"disabled","enabled":false,"feature_enabled":true},"impressionData":false},{"name":"granular-notifications","enabled":true,"variant":{"name":"disabled","enabled":false,"feature_enabled":true},"impressionData":false},{"name":"automations-fable","enabled":true,"variant":{"name":"disabled","enabled":false,"feature_enabled":true},"impressionData":false},{"name":"fixed-ai-action-pricing","enabled":true,"variant":{"name":"disabled","enabled":false,"feature_enabled":true},"impressionData":false},{"name":"site-roles","enabled":true,"variant":{"name":"disabled","enabled":false,"feature_enabled":true},"impressionData":false},{"name":"automation-resolve-merge-conflict","enabled":true,"variant":{"name":"disabled","enabled":false,"feature_enabled":true},"impressionData":false},{"name":"scoped-publishing","enabled":true,"variant":{"name":"disabled","enabled":false,"feature_enabled":true},"impressionData":false},{"name":"mintql","enabled":true,"variant":{"name":"disabled","enabled":false,"feature_enabled":true},"impressionData":false},{"name":"page-level-analytics","enabled":true,"variant":{"name":"disabled","enabled":false,"feature_enabled":true},"impressionData":false},{"name":"editor-version-history-v2","enabled":true,"variant":{"name":"disabled","enabled":false,"feature_enabled":true},"impressionData":false},{"name":"billing-page-v2","enabled":true,"variant":{"name":"disabled","enabled":false,"feature_enabled":true},"impressionData":false},{"name":"full-page-search","enabled":true,"variant":{"name":"disabled","enabled":false,"feature_enabled":true},"impressionData":false},{"name":"workspace-projects","enabled":true,"variant":{"name":"disabled","enabled":false,"feature_enabled":true},"impressionData":false},{"name":"assistant-v5","enabled":true,"variant":{"name":"disabled","enabled":false,"feature_enabled":true},"impressionData":false},{"name":"fork-pr-previews","enabled":true,"variant":{"name":"disabled","enabled":false,"feature_enabled":true},"impressionData":false},{"name":"revalidation-jwt","enabled":true,"variant":{"name":"disabled","enabled":false,"feature_enabled":true},"impressionData":false},{"name":"workos-sso-scim","enabled":true,"variant":{"name":"disabled","enabled":false,"feature_enabled":true},"impressionData":false},{"name":"hobby-abuse-scan","enabled":true,"variant":{"name":"disabled","enabled":false,"feature_enabled":true},"impressionData":false},{"name":"dashboard-inbox","enabled":true,"variant":{"name":"disabled","enabled":false,"feature_enabled":true},"impressionData":false},{"name":"workos-signup","enabled":true,"variant":{"name":"disabled","enabled":false,"feature_enabled":true},"impressionData":false},{"name":"turbopuffer-dual-write","enabled":true,"variant":{"name":"disabled","enabled":false,"feature_enabled":true},"impressionData":false},{"name":"workos-enabled","enabled":true,"variant":{"name":"disabled","enabled":false,"feature_enabled":true},"impressionData":false},{"name":"approve-review-flow","enabled":true,"variant":{"name":"disabled","enabled":false,"feature_enabled":true},"impressionData":false},{"name":"editor-metadata","enabled":true,"variant":{"name":"disabled","enabled":false,"feature_enabled":true},"impressionData":false},{"name":"sso-setup-deadline-banner","enabled":true,"variant":{"name":"disabled","enabled":false,"feature_enabled":true},"impressionData":false},{"name":"turbopuffer-serve","enabled":true,"variant":{"name":"disabled","enabled":false,"feature_enabled":true},"impressionData":false},{"name":"live-agents","enabled":true,"variant":{"name":"disabled","enabled":false,"feature_enabled":true},"impressionData":false},{"name":"starter-pricing","enabled":true,"variant":{"name":"control","enabled":true,"payload":{"type":"string","value":"control"},"feature_enabled":true},"impressionData":false},{"name":"llms-txt-v2","enabled":true,"variant":{"name":"disabled","enabled":false,"feature_enabled":true},"impressionData":false},{"name":"wildcard-email-auth","enabled":true,"variant":{"name":"disabled","enabled":false,"feature_enabled":true},"impressionData":false}],"googleFontsInlined":false},"customCss":[]}
{"page":{"pagePath":"quickstart","slug":"/quickstart","pageMetadata":{"title":"Badge quickstart","description":"Add an event, design a template, pair a printer, and check in your first attendee, end to end.","href":"/quickstart"},"description":{"compiledSource":"\"use strict\";\nconst {jsx: _jsx} = arguments[0];\nconst {useMDXComponents: _provideComponents} = arguments[0];\nfunction _createMdxContent(props) {\n const _components = {\n p: \"p\",\n ..._provideComponents(),\n ...props.components\n };\n return _jsx(_components.p, {\n children: \"Add an event, design a template, pair a printer, and check in your first attendee, end to end.\"\n });\n}\nfunction MDXContent(props = {}) {\n const {wrapper: MDXLayout} = {\n ..._provideComponents(),\n ...props.components\n };\n return MDXLayout ? _jsx(MDXLayout, {\n ...props,\n children: _jsx(_createMdxContent, {\n ...props\n })\n }) : _createMdxContent(props);\n}\nreturn {\n default: MDXContent\n};\n","frontmatter":{},"scope":{}},"pageType":"default","mdx":{"mdxSource":{"compiledSource":"\"use strict\";const{Fragment:_Fragment,jsx:_jsx,jsxs:_jsxs}=arguments[0];const{useMDXComponents:_provideComponents}=arguments[0];function _createMdxContent(props){const _components={a:`a`,code:`code`,li:`li`,p:`p`,strong:`strong`,ul:`ul`,..._provideComponents(),...props.components},{Card,CardGroup,Frame,Heading,Note,OptimizedImage,Step,Steps}=_components;if(!Card)_missingMdxReference(`Card`,true);if(!CardGroup)_missingMdxReference(`CardGroup`,true);if(!Frame)_missingMdxReference(`Frame`,true);if(!Heading)_missingMdxReference(`Heading`,true);if(!Note)_missingMdxReference(`Note`,true);if(!OptimizedImage)_missingMdxReference(`OptimizedImage`,true);if(!Step)_missingMdxReference(`Step`,true);if(!Steps)_missingMdxReference(`Steps`,true);return _jsxs(_Fragment,{children:[_jsx(_components.p,{children:`This walkthrough takes you from an empty workspace to a working check-in station. You add an event from Eventbrite or Luma, design a badge template, pair a Zebra label printer, and hand your staff a 6-character code for mobile check-in.`}),`\n`,_jsxs(Note,{children:[_jsx(_components.p,{children:_jsx(_components.strong,{children:`Before you start`})}),_jsxs(_components.ul,{children:[`\n`,_jsxs(_components.li,{children:[`A Badge workspace account. See `,_jsx(_components.a,{href:`/administration/workspace/members`,children:`Members`}),`.`]}),`\n`,_jsxs(_components.li,{children:[`An `,_jsx(_components.a,{href:`/integrations/eventbrite`,children:`Eventbrite`}),` or `,_jsx(_components.a,{href:`/integrations/luma`,children:`Luma`}),` account connected to Badge, or your attendee list as a CSV.`]}),`\n`,_jsxs(_components.li,{children:[`For printing: a `,_jsx(_components.a,{href:`/printer-setup/supported-zebra-models`,children:`supported label printer`}),` and Google Chrome or Microsoft Edge on the print-station laptop.`]}),`\n`]})]}),`\n`,_jsx(Heading,{level:`2`,id:`run-the-full-flow`,children:`Run the full flow`}),`\n`,_jsxs(Steps,{children:[_jsx(Step,{title:`Add an event to Badge`,children:_jsxs(_components.p,{children:[`Sign in at `,_jsx(_components.a,{href:`https://eventsbadge.com`,children:`eventsbadge.com`}),`, open `,_jsx(_components.strong,{children:`Events`}),` in the sidebar, and click `,_jsx(_components.strong,{children:`Import Event`}),`. Pick `,_jsx(_components.strong,{children:`Eventbrite`}),` or `,_jsx(_components.strong,{children:`Luma`}),` in the provider picker, then click `,_jsx(_components.strong,{children:`Import`}),` next to the event you want. Badge starts importing attendees in the background. See `,_jsx(_components.a,{href:`/events/create`,children:`Add an event`}),` for the dialog reference. Registrations in a spreadsheet instead? Click `,_jsx(_components.strong,{children:`Create Event`}),`, then upload the list as described in `,_jsx(_components.a,{href:`/events/upload-csv`,children:`Upload attendees from a CSV`}),`.`]})}),_jsx(Step,{title:`Wait for the import to complete`,children:_jsxs(_components.p,{children:[`The event opens in import-progress view while attendees are pulled from the provider. When the import finishes, the event detail page appears with stat cards, the staff access code, and a default badge template. See `,_jsx(_components.a,{href:`/concepts/sync-status`,children:`Sync status`}),` for what the status badges mean.`]})}),_jsx(Step,{title:`Design the badge template`,children:_jsxs(_components.p,{children:[`On the event page, find the `,_jsx(_components.strong,{children:`Badge Template`}),` card and click `,_jsx(_components.strong,{children:`Manage`}),`, then open the default template. The visual editor opens with text, image, QR, and rectangle tools. Drop the elements you need and bind text fields to attendee data like full name, company, and ticket name. See `,_jsx(_components.a,{href:`/templates/editor-overview`,children:`Editor overview`}),` and `,_jsx(_components.a,{href:`/templates/add-elements`,children:`Add elements`}),`.`]})}),_jsx(Step,{title:`Pair your Zebra printer`,children:_jsxs(_components.p,{children:[`From the template editor toolbar, click `,_jsx(_components.strong,{children:`Connect printer`}),`. The browser opens a permission dialog. Pick your Zebra model and click `,_jsx(_components.strong,{children:`Connect`}),`, then click `,_jsx(_components.strong,{children:`Print test`}),` to confirm the layout. Full setup is in `,_jsx(_components.a,{href:`/printer-setup/webusb-connection`,children:`Connect a printer`}),`. On a Windows laptop, complete `,_jsx(_components.a,{href:`/printer-setup/windows-troubleshooting`,children:`Windows troubleshooting`}),` first.`]})}),_jsxs(Step,{title:`Share the staff access code`,children:[_jsxs(_components.p,{children:[`Back on the event page, the `,_jsx(_components.strong,{children:`Staff Access`}),` card shows a 6-character code and a QR. Share the code with your check-in staff. They enter it at `,_jsx(_components.code,{children:`/badge/staff`}),` on any phone or tablet. See `,_jsx(_components.a,{href:`/staff-stations/get-access-code`,children:`Get the access code`}),` for the share-and-handoff details.`]}),_jsx(Frame,{caption:`The Staff Access card on the event page`,children:_jsx(OptimizedImage,{src:`https://mintcdn.com/eventsbadge/sVLPHidr7TFp4nzL/images/screens/staff-access-card.png?fit=max\u0026auto=format\u0026n=sVLPHidr7TFp4nzL\u0026q=85\u0026s=c0324d9cc7f43e5e8cca4d42f12a6551`,alt:`Staff Access card with a QR code, the 6-character access code and the check-in link`,width:`312`,\"data-og-width\":`468`,\"data-og-height\":`585`,\"data-path\":`images/screens/staff-access-card.png`,\"data-optimize\":`true`,\"data-opv\":`3`,srcset:`https://mintcdn.com/eventsbadge/sVLPHidr7TFp4nzL/images/screens/staff-access-card.png?w=280\u0026fit=max\u0026auto=format\u0026n=sVLPHidr7TFp4nzL\u0026q=85\u0026s=2a592857f592e18c4b4a695434a33daa 280w, https://mintcdn.com/eventsbadge/sVLPHidr7TFp4nzL/images/screens/staff-access-card.png?w=560\u0026fit=max\u0026auto=format\u0026n=sVLPHidr7TFp4nzL\u0026q=85\u0026s=f43313e275e63b50c1832ec3dd811b90 560w, https://mintcdn.com/eventsbadge/sVLPHidr7TFp4nzL/images/screens/staff-access-card.png?w=840\u0026fit=max\u0026auto=format\u0026n=sVLPHidr7TFp4nzL\u0026q=85\u0026s=d667795af48541976f3d6bed8c221669 840w, https://mintcdn.com/eventsbadge/sVLPHidr7TFp4nzL/images/screens/staff-access-card.png?w=1100\u0026fit=max\u0026auto=format\u0026n=sVLPHidr7TFp4nzL\u0026q=85\u0026s=31d0a5cd82eb660799e255092e7c66e2 1100w, https://mintcdn.com/eventsbadge/sVLPHidr7TFp4nzL/images/screens/staff-access-card.png?w=1650\u0026fit=max\u0026auto=format\u0026n=sVLPHidr7TFp4nzL\u0026q=85\u0026s=871f08f0727ee048c024006fe75c0e32 1650w, https://mintcdn.com/eventsbadge/sVLPHidr7TFp4nzL/images/screens/staff-access-card.png?w=2500\u0026fit=max\u0026auto=format\u0026n=sVLPHidr7TFp4nzL\u0026q=85\u0026s=60468d748df79effc1b5f4d4cba95558 2500w`})})]}),_jsx(Step,{title:`Bring the print station online`,children:_jsxs(_components.p,{children:[`On the laptop connected to the printer, click `,_jsx(_components.strong,{children:`Station mode`}),` in the event header. The `,_jsx(_components.strong,{children:`Station Setup`}),` card opens. Enter a `,_jsx(_components.strong,{children:`Station Name`}),`, for example `,_jsx(_components.code,{children:`Main entrance`}),`, and click `,_jsx(_components.strong,{children:`Go online`}),`. The station connects the printer and starts taking badge jobs. See `,_jsx(_components.a,{href:`/printer-setup/webusb-connection`,children:`Connect a printer`}),`.`]})}),_jsx(Step,{title:`Check in your first attendee`,children:_jsxs(_components.p,{children:[`Have a staff member open the staff link on a phone. Check-in mode opens on its own. They tap the station chip in the header, pick your station, then tap `,_jsx(_components.strong,{children:`Scan Ticket`}),`, scan a ticket QR, and confirm in the drawer. The attendee is marked checked in and the badge prints at the station. See `,_jsx(_components.a,{href:`/staff-stations/qr-scan-checkin`,children:`QR scan check-in`}),`.`]})})]}),`\n`,_jsx(Heading,{level:`2`,id:`what’s-next`,children:`What’s next`}),`\n`,_jsxs(CardGroup,{cols:2,children:[_jsx(Card,{title:`Events, attendees, templates`,icon:`diagram-project`,href:`/concepts/events-attendees-templates`,children:_jsx(_components.p,{children:`The three core entities in Badge and how they relate.`})}),_jsx(Card,{title:`Recovering from disconnect`,icon:`rotate`,href:`/events/recovering-from-disconnect`,children:_jsxs(_components.p,{children:[`What to do when an event’s `,_jsx(_components.code,{children:`DISCONNECTED`}),` badge appears.`]})}),_jsx(Card,{title:`Manual search check-in`,icon:`magnifying-glass`,href:`/staff-stations/manual-search-checkin`,children:_jsx(_components.p,{children:`Find attendees by name when QR scanning isn’t an option.`})}),_jsx(Card,{title:`Printer settings`,icon:`sliders`,href:`/templates/printer-settings`,children:_jsx(_components.p,{children:`Label size presets and calibration from inside the editor.`})})]})]})}function MDXContent(props={}){const{wrapper:MDXLayout}={..._provideComponents(),...props.components};return MDXLayout?_jsx(MDXLayout,{...props,children:_jsx(_createMdxContent,{...props})}):_createMdxContent(props)}return{default:MDXContent};function _missingMdxReference(id,component){throw new Error(`Expected `+(component?`component`:`object`)+\" `\"+id+\"` to be defined: you likely forgot to import, pass, or provide it.\")}","frontmatter":{},"scope":{"config":{},"pageMetadata":{"title":"Badge quickstart","description":"Add an event, design a template, pair a printer, and check in your first attendee, end to end.","href":"/quickstart"}}},"mdxSourceWithNoJs":null},"mdxExtracts":{"tableOfContents":[{"title":"Run the full flow","slug":"run-the-full-flow","depth":2,"children":[]},{"title":"What’s next","slug":"what’s-next","depth":2,"children":[]}],"codeExamples":{}},"jsLinks":[],"subdomain":"eventsbadge","siteName":"Badge Docs","title":"Badge quickstart - Badge Docs","navMaps":{"firstHrefInVersion":{},"firstHrefInLanguage":{}},"lastModified":"2026-11-21T15:33:14.063Z","originalFileLocation":"quickstart.mdx"},"headHtml":"\u003cscript data-mint-head>(function(){var d=document.documentElement,p=null;if(!p){try{p=localStorage.getItem(\"isDarkMode\")}catch(e){}if(p==='true')p='dark';else if(p==='false')p='light';if(p!=='light'\u0026\u0026p!=='dark'\u0026\u0026p!=='system')p=\"system\"}var r=p==='system'?(matchMedia(\"(prefers-color-scheme: dark)\").matches?'dark':'light'):p;d.classList.remove(r==='dark'?'light':'dark');d.classList.add(r);d.setAttribute(\"data-theme-preference\",p)})();\u003c/script>\u003cmeta data-mint-head name=\"description\" content=\"Add an event, design a template, pair a printer, and check in your first attendee, end to end.\">\u003cmeta data-mint-head name=\"application-name\" content=\"Badge Docs\">\u003cmeta data-mint-head name=\"generator\" content=\"Mintlify\">\u003clink data-mint-head rel=\"icon\" type=\"image/png\" sizes=\"192x192\" href=\"/mintlify-assets/_mintlify/favicons/eventsbadge/0_BfPggu4ySL73cw/_generated/favicon/android-chrome-192x192.png\" media=\"(prefers-color-scheme: light)\">\u003clink data-mint-head rel=\"apple-touch-icon\" type=\"image/png\" sizes=\"180x180\" href=\"/mintlify-assets/_mintlify/favicons/eventsbadge/0_BfPggu4ySL73cw/_generated/favicon/apple-touch-icon.png\">\u003clink data-mint-head rel=\"icon\" type=\"image/png\" sizes=\"16x16\" href=\"/mintlify-assets/_mintlify/favicons/eventsbadge/0_BfPggu4ySL73cw/_generated/favicon/favicon-16x16.png\" media=\"(prefers-color-scheme: light)\">\u003clink data-mint-head rel=\"icon\" type=\"image/png\" sizes=\"32x32\" href=\"/mintlify-assets/_mintlify/favicons/eventsbadge/0_BfPggu4ySL73cw/_generated/favicon/favicon-32x32.png\" media=\"(prefers-color-scheme: light)\">\u003clink data-mint-head rel=\"shortcut icon\" type=\"image/x-icon\" href=\"/mintlify-assets/_mintlify/favicons/eventsbadge/0_BfPggu4ySL73cw/_generated/favicon/favicon.ico\" media=\"(prefers-color-scheme: light)\">\u003clink data-mint-head rel=\"icon\" type=\"image/png\" sizes=\"192x192\" href=\"/mintlify-assets/_mintlify/favicons/eventsbadge/0_BfPggu4ySL73cw/_generated/favicon-dark/android-chrome-192x192.png\" media=\"(prefers-color-scheme: dark)\">\u003clink data-mint-head rel=\"icon\" type=\"image/png\" sizes=\"16x16\" href=\"/mintlify-assets/_mintlify/favicons/eventsbadge/0_BfPggu4ySL73cw/_generated/favicon-dark/favicon-16x16.png\" media=\"(prefers-color-scheme: dark)\">\u003clink data-mint-head rel=\"icon\" type=\"image/png\" sizes=\"32x32\" href=\"/mintlify-assets/_mintlify/favicons/eventsbadge/0_BfPggu4ySL73cw/_generated/favicon-dark/favicon-32x32.png\" media=\"(prefers-color-scheme: dark)\">\u003clink data-mint-head rel=\"shortcut icon\" type=\"image/x-icon\" href=\"/mintlify-assets/_mintlify/favicons/eventsbadge/0_BfPggu4ySL73cw/_generated/favicon-dark/favicon.ico\" media=\"(prefers-color-scheme: dark)\">\u003cmeta data-mint-head property=\"og:title\" content=\"Badge quickstart - Badge Docs\">\u003cmeta data-mint-head property=\"og:description\" content=\"Add an event, design a template, pair a printer, and check in your first attendee, end to end.\">\u003cmeta data-mint-head property=\"og:site_name\" content=\"Badge Docs\">\u003cmeta data-mint-head property=\"og:url\" content=\"https://docs.eventsbadge.com/quickstart\">\u003cmeta data-mint-head property=\"og:type\" content=\"website\">\u003cmeta data-mint-head property=\"og:image\" content=\"https://eventsbadge.mintlify.site/_mintlify/api/og/v2?division=Get+started\u0026amp;title=Badge+quickstart\u0026amp;description=Add+an+event%2C+design+a+template%2C+pair+a+printer%2C+and+check+in+your+first+attendee%2C+end+to+end.\u0026amp;theme=e33f99292d402ed8cf736b24\u0026amp;signature=8da41229bac1034844cecb5bda91aa9c651db30edc8696c2a329374e437e4cb5\">\u003cmeta data-mint-head property=\"og:image:width\" content=\"1200\">\u003cmeta data-mint-head property=\"og:image:height\" content=\"630\">\u003cmeta data-mint-head name=\"twitter:card\" content=\"summary_large_image\">\u003cmeta data-mint-head name=\"twitter:title\" content=\"Badge quickstart - Badge Docs\">\u003cmeta data-mint-head name=\"twitter:description\" content=\"Add an event, design a template, pair a printer, and check in your first attendee, end to end.\">\u003cmeta data-mint-head name=\"twitter:image\" content=\"https://eventsbadge.mintlify.site/_mintlify/api/og/v2?division=Get+started\u0026amp;title=Badge+quickstart\u0026amp;description=Add+an+event%2C+design+a+template%2C+pair+a+printer%2C+and+check+in+your+first+attendee%2C+end+to+end.\u0026amp;theme=e33f99292d402ed8cf736b24\u0026amp;signature=8da41229bac1034844cecb5bda91aa9c651db30edc8696c2a329374e437e4cb5\">\u003cmeta data-mint-head name=\"twitter:image:width\" content=\"1200\">\u003cmeta data-mint-head name=\"twitter:image:height\" content=\"630\">\u003cmeta data-mint-head name=\"msapplication-config\" content=\"/mintlify-assets/_mintlify/favicons/eventsbadge/0_BfPggu4ySL73cw/_generated/favicon/browserconfig.xml\">\u003cmeta data-mint-head name=\"apple-mobile-web-app-title\" content=\"Badge Docs\">\u003cmeta data-mint-head name=\"msapplication-TileColor\" content=\"#5252FF\">\u003clink data-mint-head rel=\"canonical\" href=\"https://docs.eventsbadge.com/quickstart\">\u003clink data-mint-head rel=\"alternate\" type=\"application/xml\" href=\"/sitemap.xml\">\u003clink data-mint-head rel=\"alternate\" type=\"text/markdown\" href=\"/quickstart.md\">\u003cscript data-mint-head type=\"application/ld+json\">{\"@context\":\"https://schema.org\",\"@graph\":[{\"@type\":\"Organization\",\"@id\":\"https://docs.eventsbadge.com/#organization\",\"name\":\"Badge Docs\",\"url\":\"https://docs.eventsbadge.com\",\"logo\":{\"@type\":\"ImageObject\",\"url\":\"https://mintcdn.com/eventsbadge/sVLPHidr7TFp4nzL/logo/badge-light.svg?fit=max\u0026auto=format\u0026n=sVLPHidr7TFp4nzL\u0026q=85\u0026s=590a54fc63ff87bdca58075533cb65a0\"}},{\"@type\":\"WebSite\",\"@id\":\"https://docs.eventsbadge.com#website\",\"name\":\"Badge Docs\",\"url\":\"https://docs.eventsbadge.com\",\"publisher\":{\"@id\":\"https://docs.eventsbadge.com/#organization\"}},{\"@type\":\"WebPage\",\"@id\":\"https://docs.eventsbadge.com/quickstart#webpage\",\"url\":\"https://docs.eventsbadge.com/quickstart\",\"name\":\"Badge quickstart\",\"description\":\"Add an event, design a template, pair a printer, and check in your first attendee, end to end.\",\"dateModified\":\"2026-11-21T15:33:14.063Z\",\"isPartOf\":{\"@id\":\"https://docs.eventsbadge.com#website\"},\"breadcrumb\":{\"@id\":\"https://docs.eventsbadge.com/quickstart#breadcrumb\"}},{\"@type\":\"BreadcrumbList\",\"@id\":\"https://docs.eventsbadge.com/quickstart#breadcrumb\",\"itemListElement\":[{\"@type\":\"ListItem\",\"position\":1,\"name\":\"Get started\",\"item\":\"https://docs.eventsbadge.com\"},{\"@type\":\"ListItem\",\"position\":2,\"name\":\"Badge quickstart\",\"item\":\"https://docs.eventsbadge.com/quickstart\"}]},{\"@type\":[\"Article\",\"TechArticle\"],\"@id\":\"https://docs.eventsbadge.com/quickstart#article\",\"headline\":\"Badge quickstart\",\"name\":\"Badge quickstart\",\"description\":\"Add an event, design a template, pair a printer, and check in your first attendee, end to end.\",\"url\":\"https://docs.eventsbadge.com/quickstart\",\"mainEntityOfPage\":{\"@id\":\"https://docs.eventsbadge.com/quickstart#webpage\"},\"dateModified\":\"2026-11-21T15:33:14.063Z\",\"publisher\":{\"@id\":\"https://docs.eventsbadge.com/#organization\"},\"isPartOf\":{\"@id\":\"https://docs.eventsbadge.com#website\"}}]}\u003c/script>\u003cscript data-mint-head type=\"application/ld+json\">{\"@context\":\"https://schema.org\",\"@type\":\"WebSite\",\"name\":\"Badge Docs\",\"publisher\":{\"@type\":\"Organization\",\"name\":\"Badge Docs\"},\"provider\":{\"@type\":\"Organization\",\"name\":\"Mintlify\",\"url\":\"https://mintlify.com\"}}\u003c/script>","agentPointerHref":"/quickstart.md","siteName":"Badge Docs","nav":{"global":{"anchors":[{"anchor":"Badge Home","icon":"house","href":"https://eventsbadge.com"},{"anchor":"Book a Call","icon":"phone","href":"https://trytalkvalue.com/book-a-call"},{"anchor":"Status","icon":"circle-check","href":"https://status.trytalkvalue.com"},{"anchor":"Support","icon":"life-ring","href":"mailto:support@trytalkvalue.com"}]},"tabs":[{"tab":"Guides","icon":"ticket","groups":[{"group":"Get started","pages":[{"title":"Badge","description":"Event check-in with custom badges, a template editor, a mobile staff station, and lead capture for sponsor booths.","href":""},{"title":"Badge quickstart","href":"/quickstart"},{"title":"Create your workspace","description":"Create your first Badge workspace, name it, and set up billing.","href":"/workspace/create-workspace"},{"title":"Invite teammates","href":"/workspace/invite-teammates"}]},{"group":"Concepts","pages":[{"title":"Events, attendees, templates","href":"/concepts/events-attendees-templates"},{"title":"Access codes","href":"/concepts/access-codes"},{"title":"Sync status","href":"/concepts/sync-status"}]},{"group":"Events","pages":[{"title":"Add an event to Badge","href":"/events/create"},{"title":"Upload attendees from a CSV","href":"/events/upload-csv"},{"title":"Import attendees","href":"/events/import-attendees"},{"title":"Send welcome emails","href":"/events/welcome-email"},{"title":"Recovering from disconnect","href":"/events/recovering-from-disconnect"},{"title":"Lead capture","href":"/events/lead-capture"}]},{"group":"Templates","pages":[{"title":"Template editor","href":"/templates/editor-overview"},{"title":"Add elements","href":"/templates/add-elements"},{"title":"Printer settings","href":"/templates/printer-settings"}]},{"group":"Printer setup","pages":[{"title":"Supported printers","href":"/printer-setup/supported-zebra-models"},{"title":"Connect a printer","href":"/printer-setup/webusb-connection"},{"title":"Calibration and troubleshooting","href":"/printer-setup/calibration-troubleshooting"},{"title":"Windows troubleshooting","href":"/printer-setup/windows-troubleshooting"}]},{"group":"Staff stations","pages":[{"title":"Get the access code","href":"/staff-stations/get-access-code"},{"title":"Open on mobile","href":"/staff-stations/open-on-mobile"},{"title":"QR scan check-in","href":"/staff-stations/qr-scan-checkin"},{"title":"Manual search check-in","href":"/staff-stations/manual-search-checkin"}]},{"group":"Integrations","pages":[{"title":"Connect Eventbrite","href":"/integrations/eventbrite"},{"title":"Connect Luma","href":"/integrations/luma"}]}]},{"tab":"Administration","icon":"gear","pages":[{"title":"Administration","href":"/administration/account/profile"}]}]},"basePath":"","title":"Badge quickstart - Badge Docs","deploymentId":"dpl_DyXGnKeCjZyA3sUdfMJ7FjkdBefg","buildId":"dpl_DyXGnKeCjZyA3sUdfMJ7FjkdBefg","dynamics":["07c022d89b","a74be98ba7"],"chunks":["Frame-D0FT0qQs.js","DynamicMarkdown-CQM9Bhbv.js","zoom-image-lightbox-BQ4tbj_9.js","lightbox-handle-r17bVUz3.js"]}